
먼저 순수하게 번들링 파일을 까보자.
난독화가 되어있어서 알아보기 힘들지만, 난독화의 경우, 객체의 멤버 혹은 메소드 혹은 원시값들은 변형시킬 수 없다.
이 성질을 이용해 추론해보자.
먼저 DOM 상, canvas id의 three.js 특유의 흔적이 남아있어서, threejs를 사용했다는 사실은 자명하다.

문제는 에이전시라 그런지, 온갖 파트에 canvas를 떡칠해놓았다.
즉, 번들링 된 코드 상에서도 상당히 많은 three.js 코드들이 있다는 뜻인데...
분명 fbm을 썼을 테니, fbm을 키워드 삼아 검색해보았다.
(헤헤... 찾았다)
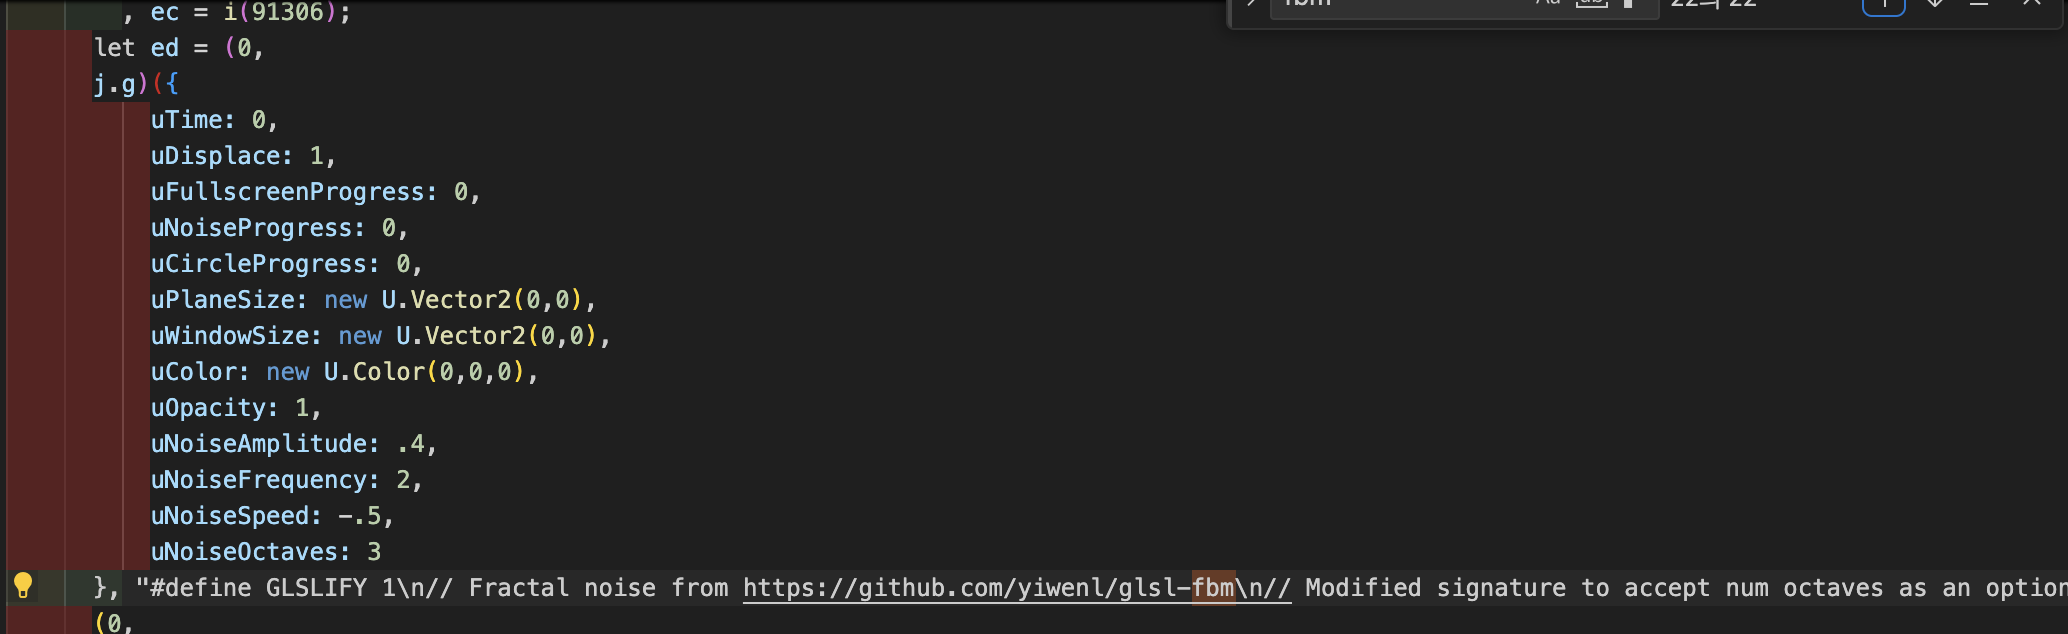
변수 이름들 보아하니, j.g가 shaderMaterial을 선언하는 부분인듯 하다.
그 뜻은 이 주위에 render 관련 메서드가 있다는 뜻이다.
아니나 다를까나
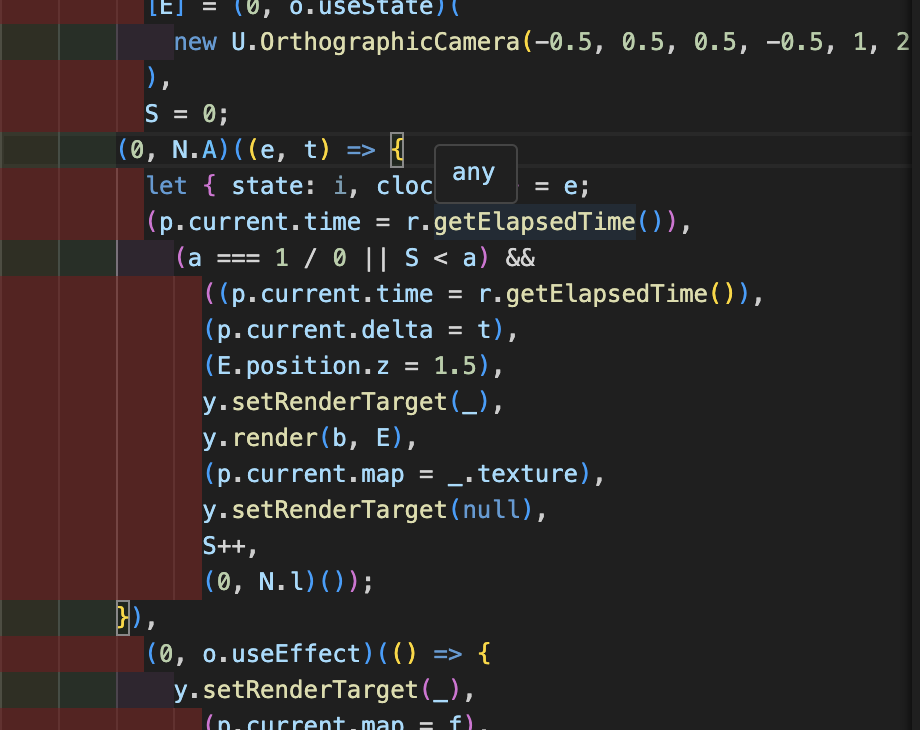
이 부분이 확실하다.
e라는 매개변수에서 state, clock 뽑는거 보니까 , A란 객체는 r3f인듯하다.
이제 내가 타고 올라가야할 부분은 '_' 부분이다. 저부분이 텍스쳐를 할당하는 부분인데, 따라 올라가서 한번 재구성 해보았다.
export class TrailCanvas {
  constructor({
    width = document.body.offsetWidth,
    height = document.body.offsetHeight,
    maxAge = 750,
    radius = 0.3,
    intensity = 0.2,
    interpolate = false,
    smoothing = 0,
    minForce = 0.3,
    blend = "screen",
    ease = (x) => {
      return 1 - Math.pow(1 - x, 3);
    },
  } = {}) {
    this.width = width;
    this.height = height;
    this.size = Math.min(this.width, this.height);
    this.maxAge = maxAge;
    this.radius = radius;
    this.intensity = intensity;
    this.ease = ease;
    this.interpolate = interpolate;
    this.smoothing = smoothing;
    this.minForce = minForce;
    this.blend = blend;
    this.trail = [];
    this.force = 0;
    this.initTexture();
  }

  initTexture() {
    this.canvas = document.createElement("canvas");
    this.canvas.width = this.width;
    this.canvas.height = this.height;
    this.ctx = this.canvas.getContext("2d");
    this.ctx.fillStyle = "black";
    this.ctx.fillRect(0, 0, this.canvas.width, this.canvas.height);
    this.texture = new THREE.Texture(this.canvas);
    this.canvas.id = "touchTexture";
    this.canvas.style.width = this.canvas.width + "px";
    this.canvas.style.height = this.canvas.height + "px";
    this.canvas.style.position = "absolute";
    this.canvas.style.top = "0px";
    this.canvas.style.left = "0px";
    document.body.appendChild(this.canvas);
  }
  update(time) {
    this.clear();
    this.trail.forEach((trail, idx) => {
      trail.age += 1e1 * time;
      trail.age > this.maxAge && this.trail.splice(idx, 1);
    });

    this.trail.length || (this.force = 0);
    this.trail.forEach((trail) => {
      this.drawTouch(trail);
    });
    this.texture.needsUpdate = true;
  }
  clear() {
    this.ctx.globalCompositeOperation = "source-over";
    this.ctx.fillStyle = "black";
    this.ctx.fillRect(0, 0, this.canvas.width, this.canvas.height);
  }
  addTouch(touch) {
    let prevTrail = this.trail[this.trail.length - 1];

    if (prevTrail) {
      let distanceX = prevTrail.x - touch.x;
      let distanceY = prevTrail.y - touch.y;

      let distance = distanceX * distanceX + distanceY * distanceY; // n
      let power = Math.max(this.minForce, Math.min(1e4 * distance, 1));

      this._updateForce(power, this.force, this.smoothing);

      if (this.interpolate) {
        // create dots to interpolate distance
        let offsetCnt = Math.ceil(distance / Math.pow((0.5 * this.radius) / this.interpolate, 2));

        if (offsetCnt > 1) {
          for (let i = 1; i < offsetCnt; i++) {
            this.trail.push({
              x: prevTrail.x - (distanceX / offsetCnt) * i,
              y: prevTrail.y - (distanceY / offsetCnt) * i,
              age: 0,
              force: power,
            });
          }
        }
      }
    }

    this.trail.push({
      x: touch.x,
      y: touch.y,
      age: 0,
      force: this.force,
    });
  }

  drawTouch(trail) {
    let trailPaint = {
      x: trail.x * this.width,
      y: (1 - trail.y) * this.height,
    };

    let lifespanPaint = 1;
    const agingInflectionPoint = 0.3;

    lifespanPaint =
      (trail.age < agingInflectionPoint * this.maxAge
        ? this.ease(trail.age / (agingInflectionPoint * this.maxAge))
        : this.ease(
            1 - (trail.age - agingInflectionPoint * this.maxAge) / ((1 - agingInflectionPoint) * this.maxAge),
          )) * trail.force;

    this.ctx.globalCompositeOperation = this.blend;
    let paintRadius = this.size * this.radius * lifespanPaint;
    let gradient = this.ctx.createRadialGradient(
      trailPaint.x,
      trailPaint.y,
      Math.max(0, 0.25 * paintRadius),
      trailPaint.x,
      trailPaint.y,
      Math.max(0, paintRadius),
    );

    const startColor = `rgba(255,255,255,${this.intensity})`;
    const endColor = "rgba(0,0, 0, 0.0)";

    gradient.addColorStop(0, startColor);
    gradient.addColorStop(1, endColor);
    this.drawCircle(trailPaint.x, trailPaint.y, Math.max(0, paintRadius), gradient);
  }

  drawCircle(x, y, r, color) {
    this.ctx.beginPath;
    this.ctx.fillStyle = color;
    this.ctx.arc(x, y, Math.max(0, r), 0, 2 * Math.PI);
    this.ctx.fill();
  }

  _updateForce(forceS) {
    const lerpFactor = this.smoothing || 0.9;
    this.force = lerp(forceS, this.force, lerpFactor);
  }
}

function lerp(v1, v2, f) {
  return f * v1 + v2 * (1 - f);
}
굉장히 흥미로운 부분이, offscreen canvas를 하나 생성하고, 연산 후 해당 값을 텍스쳐화 시켜서 쉐이더에 넘겼다.
threejs 사용할 때, 이런식으로 사용할 수 있는줄 몰랐는데, 굉장히 신박했다.
이걸 복구하고 나니 깨달은게, 14Island에서는 마우스의 위치가 아니라, 마우스와 이전 좌표간 거리를 보간하여 자취를 생성한다.
확실히 마우스 딱 그지점에만 물방울을 떨어뜨리는 것보단, 점진적으로 물을 흘리듯? 해야 실제로 물감을 칠하는 느낌에 더 가까운게 맞는듯하다... (이걸 어케 생각해 내는거지...?)
이제 내가 찾아야하는 것은, 해당 클래스를 인스턴스화 시킬 때, 무슨 파라미터를 넣었는지 찾는 것이다.
열심히 노가다해서 찾은 결과는 다음과 같다.
const config = {
     width: 512,
      height: 512 * (document.body.offsetHeight / document.body.offsetWidth), // tmp maybe for aspect ratio,
      smoothing: 0.4,
      maxAge: 50,
      smoothing: 0,
      radius: 0.06,
      interpolate: 2,
      minForce: 0.6,
      intensity: 1,
      blend: "screen",
 }
참고로 offscreen canvas를 렌더링을 하면 위와 같다.
이제 해당 자취 (trail)을 텍스쳐 삼아 기존에 만든 쉐이더에 섞기만 하면 끝이다.
기존 코드를 재사용해도 된다.
  vec3 floodColor = texel.rgb;
  floodColor = blendDarken(floodColor, texelXp.rgb);
  floodColor = blendDarken(floodColor, texelXn.rgb);
  floodColor = blendDarken(floodColor, texelYp.rgb);
  floodColor = blendDarken(floodColor, texelYn.rgb);

  // trail
  vec3 gradientColor = hsl2rgb(mod(uTime*100./360.0, 1.0), uSaturation, uLuminosity);
  float line = smoothstep(0.0, 1.0, trail.r);
  vec3 lineColor = mix(vec3(1.), gradientColor, line);

  vec3 waterColor = blendDarken(prev.rgb, floodColor.rgb * (1. + uBleedThreshold * uDelta), uBleedSpeed);

  // save
  vec3 finalColor = blendDarken(waterColor, lineColor, uLineStrength);

  gl_FragColor.rgba = vec4(min(bgColor, finalColor * (1.+ uFadeSpeed * uDelta )), 1.);
개인적으로 min 함수를 통해 점진적으로 연한 색상값부터 사라지도록 만든 파트에서,
uDelta가 왜 존재하는지 몰랐는데, 저 값이 프레임 간 렌더링 시간차를 뜻한다고 한다.
저 부분 취약점이라 생각하는것이, uDelta가 너무 낮으면 색상들이 너무 빠르게 사라지는 현상이 나타나고
uDelta가 너무 높으면 안사라지는 현상이 생기는데, 저 부분을 저렇게 내비둬도 되는지 싶다.
측정해보니 대충 0.015 ~ 0.00155 사이값이 나와야하는데, 성능이 좋은 컴퓨터에서는 아예 0이 나와서 색상들이 안사라지는 버그가 있다.
여튼 어찌저찌 해서... 3일동안 계속 코드를 까본 결과 ,
최종적으로 똑같이 구현해보았다.

깨달은 점 및 배운 점은 다음과 같다.
- canvas 자체에서 구한 이펙트를 텍스처 삼아 활용할 수 있다.
- chrome은 생각보다 굉장한 툴이다. (디컴파일링에서 너무 용이하다)
- js에서 if문을 c스타일로 작성할 수 있다. ( if(x =3 , x >2) {console.log('x is bigger than 2')})
- 애니메이션을 구현할 때, 한번 기존 툴들 (css, canvas)을 활용할 수 없을지 고민해보자
+ ) THREE.Clock.getDelta 와 useFrame에서 제공하는 delta랑 차이가 있더군요
getDelta함수를 호출하는 순간 Clock이 초기화가 된다고 합니다. 문서
three.js docs
threejs.org
useFrame에서 제공하는 delta는 편의성 목적으로 전역적으로 모든 frame에서 공유하는 delta이기에, delta값을 조회하는 것만으로는 초기화가 안된다하네요.
이제 vanila 고집은 좀 넣어두고 r3f를 기반으로 코드를 짜볼까 생각합니다
'WebGL' 카테고리의 다른 글
| [ThreeJs] 선형 색 공간(Linear color space) - sRGB 색보정 (0) | 2023.07.22 |
|---|---|
| [WebGL + ThreeJs] 램버시안 조명 (Lambertian Light) (0) | 2023.07.22 |
| [Graphics] 조도(Irradiance)와 휘도(Radiance) (0) | 2023.07.15 |
| [WebGL] Hemisphere Lighting (0) | 2023.07.09 |
| [WebGL] Ambient light (0) | 2023.07.09 |


